Under-sink reverse osmosis systems are gaining popularity not only for their effective water purification, but for the other benefits they provide as well. Let’s dive (pun intended) into this type of water purification system to see if it’s the right fit for you:
The Science Behind Reverse Osmosis
You may remember the term ‘osmosis’ thrown around in science class back in the day. Reverse osmosis is just as it sounds — the opposite of osmosis! Before reverse osmosis occurs, there’s untreated water that contains harmful pollutants that could be detrimental to our bodies.
Reverse osmosis is a water purification technique that allows untreated water that contains harmful bacteria and chemicals to pass through a semipermeable membrane. The semipermeable membrane only allows water to pass through it — leaving everything else behind. And the result? Water that is 95% - 99% purified!
The Benefits of Under-Sink Reverse Osmosis Systems
If you’re debating whether or not to get an under-sink reverse osmosis system because you’re unsure of the possible benefits, the time has come to make everything crystal clear! Besides making your water crystal clear, here’s a list of the profound benefits of installing a reverse osmosis water system into your home or business:
- It’s Easy to Install Yourself
We’ll get more into this down below, but RO systems are super easy to install. We were able to break down the basics of installation into six simple steps that are easy to follow! Our 4-Stage Reverse Osmosis System includes everything you’ll need to install it yourself — you also have the option to seek help from a certified plumber if you’d like to.
- It Removes Harmful Chemicals, Parasites, and Pollutants
Chlorine, Fluoride, lead, sodium, and parasites are known to float around in our drinking water. It’s disgusting and, quite frankly — terrifying. A reverse osmosis system will do a thorough job of filtering out everything that shouldn’t be in our water. While your refrigerator will try to filter these things out, they often only have one filter that isn’t very effective. There’s no reason that you should continue to drink water with these toxic additives. Protect yourself and your loved ones by switching to a RO system, so you can rest assured you’re drinking 95% to 99% purified water.
- You’ll Notice a Difference in Your Water’s Quality
Reverse osmosis systems purify water to the point where it’s noticeable to the consumer. The lack of pollutants and chemicals will make the water taste and smell better!
The Installation Process
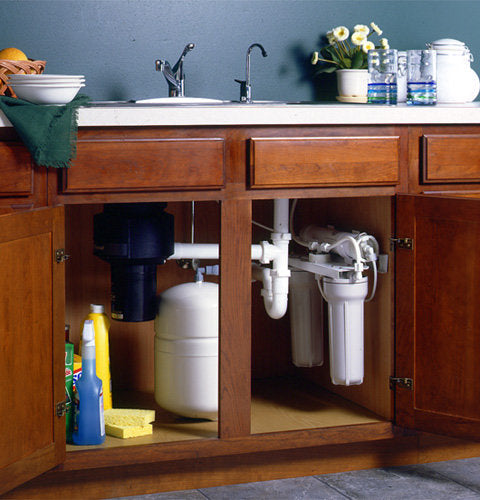
While you could hire a certified plumber to install a RO system, the process is generally achievable for those who’d prefer a DIY installation. Most RO systems can be installed within a couple of hours and require no additional parts or plumbing. Before jumping into the steps required to do a DIY installation of an under-sink reverse osmosis system, let’s go over the necessary parts you’ll need:
- Your RO system
- Reverse osmosis storage tank
- Necessary tools (differs by the type of RO system you purchase)
We’ve included everything you need to install our 4-Stage Reverse Osmosis System: a RO Unit, 3.2 Gallon Storage Tank, 50 gpd Membrane, Storage Tank Shut-off Ball Valve, Angle Stop Adapter Valve, Drain Saddle Valve, Faucet Package, Filter Housing Wrench, 1/4" & 3/8" Tubing, 5 Micron Sediment Cartridge, Carbon Block Cartridge.
Now that you know the parts you’ll need to install the RO system yourself — you’re prepared to begin the installation process! We recommend taking a look at the instructions in their entirety before following these steps:
Make sure that you have plenty of room to install the under-sink reverse osmosis system! Find a suitable location before proceeding.
Find the ‘cold’ water supply underneath your sink — this is where the RO system will be installed. If the ‘cold’ water valve isn’t working properly, you’ll need to turn off the water supply to the entire house during installation.
We recommend assembling the saddle valve clamp on the ‘cold’ water line. You should turn the pipe clamp adjustment plate to fit the contour of the pipe.
Next, you should drill a 5/16” diameter bole approximately six inches above the trap — only through one wall of the pipe!
Attach the drain clamp — but please ensure that the hole in the clamp is aligned with the hole in the pipe. You can use a drill bit to align the holes while tightening the clamp. Make sure not to tighten the clamp too much!
Here’s the moment you’ve been waiting for — it’s time to install the faucet! Make sure you find a place with a large enough flat area that will fit the faucet base. We want to make sure that your sink stays intact, so please be careful during the drilling process. We recommend drilling a ¼ diameter hole before lightly filing the edge of the hole to make sure it’s smooth. You can place the faucet stem in the hole after you’ve drilled the hole! You want to double-check that the faucet base, body, and rubber faucet base washer are above the sink and in their proper positions.
Next, install the star lock washer and nut on the faucet stem (under the sink). Be sure to tighten it firmly! Now that the faucet is installed, you can attach the ¼ tubing on the bottom of the faucet stem and tighten it. Voila! You’ve just installed a RO system!
So, Should I Get an Under-Sink Reverse Osmosis System?
Whether you’re drinking tap or filtered water from your fridge, an under-sink reverse osmosis system will elevate your life and health with cleaner and safer water. These systems deserve all of the praise they’ve received for their effectiveness, compactness, and convenience to use. Consider purchasing an under-sink reverse osmosis system if you enjoy drinking water that is purified and delicious!


